Tomato is an open-source router firmware for many of today’s routers. I have it installed on my Asus RT-N16 router, and I love it. I’ve had it running on the router for more than two years, but I just recently discovered one of its best features, Quality of Service.
In a nutshell, Quality of Service in a router prioritizes certain traffic over other traffic depending on what kind it is and it can limit the overall bandwidth of connections to and from the Internet. The benefit of this is so that roommate who always torrents won’t have a direct affect on how fast your Internet browsing is since the torrent download would have a lower priority.
Now, my QoS has a very simple rulebook. I live in an apartment with 3 other roommates, and the only time problems arise is when Netflix is being used or the games from NBA.com are being streamed. I also torrent a little (Raspberry Pi and Ubuntu installation iso’s), so I made sure to limit myself on those downloads as well. If you want a definitive guide about how to set up the QoS settings, follow the link below. It is a lengthy read.
How to set it up in Tomato
Go to Speedtest.net and get record your Internet speed. Mine is below.
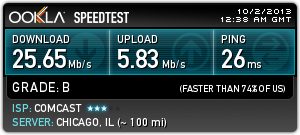
My bandwidth is approximately 25 Mbit/s downlink and 6 Mbit/s uplink. This is equivalent to 25,000 kbit/s and 6,000 kbit/s (You’ll need this for the next step).
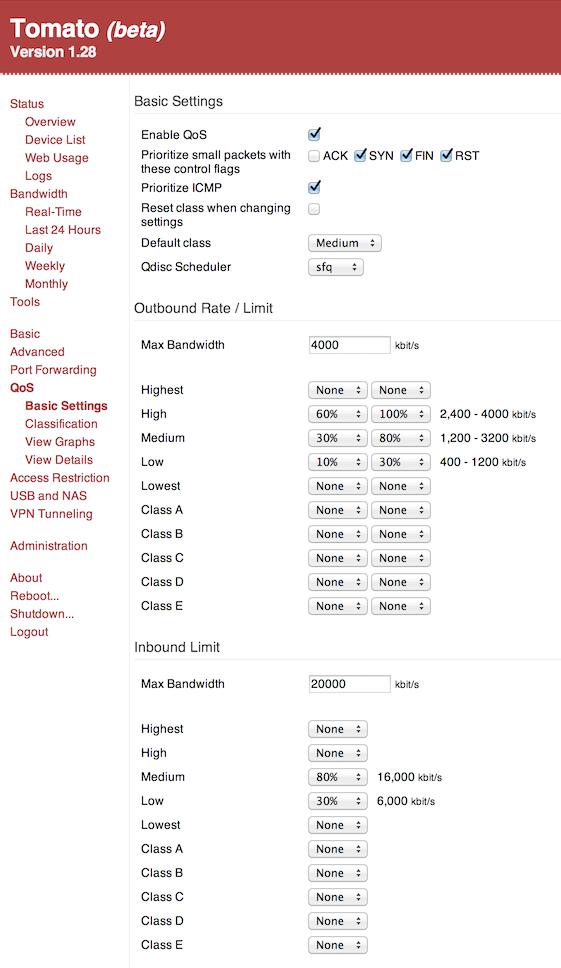
Next, navigate to your Tomato router configuration website, and in the left menu, click “QoS -> Basic Settings”.
Under the section Outbound Rate / Limit, fill in the Max Bandwidth, which is your uplink speed from your Speedtest.net multiplied by 70-80%. Make sure to convert it to kbit/s.
Under the section Inbound / Limit, fill in the Max Bandwidth, which is your downlink speed from your Speedtest.net multiplied by 70-80%. Make sure to convert it to kbit/s.
Within both sections, you will find classifications for different types of traffic (high, medium, low, etc). In my setup, I only used High, Medium, and Low to keep it simple. Each section got an appropriate amount of bandwidth percentage I felt was necessary. In Outbound, the left column is the minimum and the right is the maximum. Under Inbound, the only column is maximum. Decide on how you’ll prioritize your traffic using the dropdown menus. Mine is below.
- High : HTTP traffic and DNS requests (Internet browsing)
- Medium: HTTP Downloads (Netflix, NBA, direct downloads)
- Low: Bittorrent
Click Save
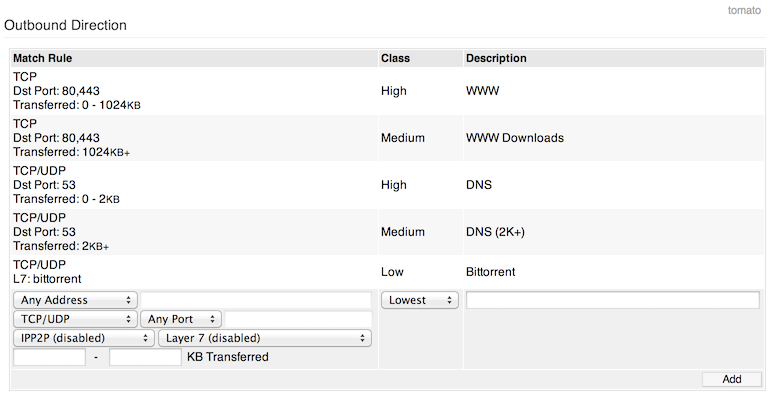
Click “Classification” in the left menu.
Fill in the chart with the things you would like to prioritize and limit.
Click Save
Go back to “Basic Settings” and click Enable at the top.
Click Save.
You now have a useful Tomato QoS setup. Make sure to experiment with it so you get the best results.